- Open SourceTree and navigate to the repository you want to update the password of
- Click the ‘Terminal’ button on a toolbar to jump to the location of the repo on the command line
- Enter ‘git pull’ command to update the repository
- Then you are requested enter your login & password
- Done
.NET Software Development Stack: ASP.NET, WPF, WinForms, ADO.NET, Entity Framework, SQL, Design Patterns
Thursday, July 30, 2015
How to Update SourceTree Git Login Credentials
Thursday, April 17, 2014
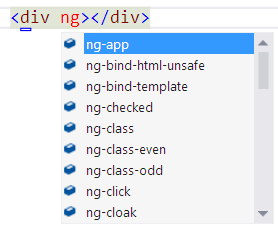
AngularJS Intellisense in Visual Studio 2012
But there are 2 options hwo yo ucan enable it:
OPTION 1 if you don't use Resharper(taken from)
Step 1
Find the file commonHTML5Types.xsd located in the Visual Studio install directory and back it up (just in case). Mine is here: C:\Program Files (x86)\Microsoft Visual Studio 11.0\Common7\Packages\schemas\htmlStep 2
Download this new version of commonHTML5Types.xsd and replace the existing one from the directory in Step 1 with it.Step 3
Restart Visual Studio and that's it. You now have all the ng-* attributes available in Intellisense. This Works On My Machinetm, so please let me know if it works on yours too.I still want to add native support in either Visual Studio or Web Essentials, so if this is something you’re interested in, please vote for it here.
OPTION 2
Use resharper-angularjsYou can get it from here - https://github.com/JetBrains/resharper-angularjs
You can install directly into ReSharper 8.0 via the Extension Manager in the ReSharper menu. Since the package is currently pre-release for 8.0 (nightly builds might introduce breaking changes), make sure "Include prerelease" is selected in the dialog.
To install in ReSharper 7.1:
- Download the latest zip file: resharper-angularjs.1.1.0.zip
- Extract everything
- Run the Install-AngularJS.7.1.bat file
Friday, November 8, 2013
The ASP.Net MVC 3 installer fails when you have a newer version of NuGet installed - WORKAROUND
MSI (s) (DC:18) [11:11:41:990]: Note: 1: 1325 2: VSIXInstaller.exe
MSI (s) (DC:18) [11:11:41:990]: Doing action: LaunchConditions
Action ended 11:11:41: AppSearch. Return value 1.
Action start 11:11:42: LaunchConditions.
MSI (s) (DC:18) [11:11:42:022]: Note: 1: 2205 2: 3: Error
MSI (s) (DC:18) [11:11:42:022]: Note: 1: 2228 2: 3: Error 4: SELECT `Message` FROM `Error` WHERE `Error` = 1709
MSI (s) (DC:18) [11:11:42:022]: Product: NuGet -- A later version of NuGet is already installed. Setup will now exit.
I had newer NuGet and the installer tried to install v.1.5.
Work around
- Run the install (even though it fails) but leave it open on the screen at the end that says "Installation Did Not Succeed" (This is very important!)
- Now you need to track down the temp files for the installer it should be in a folder {drive}:/Temp/ext27692 (probably this goes onto whatever drive has the most free space)
- Make a copy of this entire folder because finishing the installer will delete it.
- Now that you have all the install files you just need to run the installers for the different components (to double check what they were you can open the log from the installer and see which msi's it ran)
ASP.NET MVC3 tools are now installed!
Monday, July 1, 2013
Database stuck in single user mode
Msg 5064, Level 16, State 1, Line 1
Changes to the state or options of database 'DbName' cannot be made at this time. The database is in single-user mode, and a user is currently connected to it.
Msg 5069, Level 16, State 1, Line 1
ALTER DATABASE statement failed.
the only thing will help you:
Get process id of active db connection using script:
select * from master.sys.sysprocesses
where spid>50 -- don't want system sessions
and dbid = DB_ID('DbName')In my case I got 52.
And then execute:
use master
kill 52-- the connection to the database in single user mode
use [DbName]
alter database [DbName] set multi_user with rollback immediateOr:
use master
kill 52-- the connection to the database in single user mode
alter database [DbName] set offline with rollback immediate
alter database [DbName] set online, multi_user with rollback immediateHope this will help you.
Wednesday, December 5, 2012
Multiple-Constructor Injection using Unity IOC
Unity, and the dependency injection design pattern itself, really becomes useful is when the container generates instances of objects that have dependencies. It can automatically resolve the dependent object types required by the objects it creates, generate the appropriate concrete types, and then inject these concrete instances into the object it is creating.
The following shows a schematic view of the dependency injection process that Unity can accomplish.
The following are the types of injection together with descriptions of how they are applied using Unity:
- Constructor injection. This type of injection occurs automatically. When you create an instance of an object using the Unity container, it will automatically detect the constructor with the largest number of parameters and execute this, generating instances of each object defined in the constructor parameters. It resolves each parameter type through the container, applying any registrations or mappings for that type. If you want to specify a particular constructor for Unity to use, you can add the InjectionConstructor attribute to that constructor in the target class.
- Property (setter) injection. This type of injection is optional. You can add the Dependency attribute to any property declarations that you want Unity to resolve through the container. Unity will resolve that property type and set the value of the property to an instance of the resolved type.
- Method call injection. This type of injection is also optional. You can add the InjectionMethod attribute to any method declarations where you want Unity to resolve the method parameters through the container. Unity will resolve each parameter type and set the value of that parameter to an instance of the resolved type, and then it will execute the method. Method call injection is useful if you need to execute some type of initialization method within the target object.
Via http://msdn.microsoft.com/en-us/library/cc816062.aspx
Multiple-Constructor Injection Using an Attribute
When a target class contains more than one constructor with the same number of parameters, you must apply the InjectionConstructor attribute to the constructor that the Unity container will use to indicate which constructor the container should use. As with automatic constructor injection, you can specify the constructor parameters as a concrete type, or you can specify an interface or base class for which the Unity container contains a registered mapping.
e.g.
public class MyObject {
public MyObject(SomeOtherClass myObjA) { … }
[InjectionConstructor]
public MyObject(MyDependentClass myObjB) { … }
}
In your run-time code, use the Resolve method of the container to create an instance of the target class. The Unity container will instantiate the dependent concrete class defined in the attributed constructor and inject it into the target class. For example, the following code shows how you can instantiate the example target class named MyObject containing an attributed constructor that has a dependency on a class named MyDependentClass.
e.g.
IUnityContainer uContainer = new UnityContainer(); MyObject myInstance = uContainer.Resolve<MyObject>();
How Unity Resolves Target Constructors and Parameters
When a target class contains more than one constructor, Unity will use the one that has the InjectionConstructor attribute applied. If there is more than one constructor, and none carries the InjectionConstructor attribute, Unity will use the constructor with the most parameters. If there is more than one such constructor (more than one of the “longest” with the same number of parameters), Unity will raise an exception.
Constructor Injection with Existing Objects
If you use the RegisterInstance method to register an existing object, constructor injection does not take place on that object because it has already been created outside of the influence of the Unity container. Even if you call the BuildUp method of the container and pass it the existing object, constructor injection will never take place because the constructor will not execute. Instead, mark the constructor parameter containing the object you want to inject with the Dependency attribute to force property injection to take place on that object, and then call the BuildUp method. This is a similar process to property (setter) injection. It ensures that the dependent object can generate any dependent objects it requires. For more details, see Annotating Objects for Property (Setter) Injection.
Via URL
Thursday, February 10, 2011
VS2010 Tips: How to make jQuery Intellisense work for external JavaScript file
Simply drag-n-drop the jQuery library from Solution Explorer to the opened external JavaScript file.
The Intellisense should work now.
Monday, January 31, 2011
Windows Azure SDK: connecting to non SQLExpress Instance
You will receive the following message in your output window:
Windows Azure Tools: Failed to initialize the Development Storage service. Unable to start Development Storage. Failed to start Development Storage: the SQL Server instance ‘localhost\SQLExpress’ could not be found. Please configure the SQL Server instance for Development Storage using the ‘DSInit’ utility in the Windows Azure SDK.To fix this you open the Windows Azure SDK Command Prompt:
And enter the following text:
dsinit /sqlinstance:.
This will cause Azure to use the default instance (with no name). You can switch this to whatever you like, just replace the . (dot) by the appropriate MS SQL instance.
The result will look like this:
Good luck, happy coding.
Monday, January 17, 2011
How to Fix "PageHandlerFactory-Integrated" bad module "ManagedPipelineHandler in IIS7
HTTP Error 500.21 - Internal Server Error
Handler 'PageHandlerFactory-Integrated' has a bad module 'ManagedPipelineHandler' in its module list.
Apparently, the reason I was recieving the Internal Server error message was that I had installed SQL Server 2008, after installing Visual Studio 2010, and because of this it corrupted the IIS Machine level configuration files ('If you install VS2010 and then install VS2008 and VS2008 SP1, the configuration files for ASP.NET in IIS only include about 1/2 of the correct .Net 4.0 configuration sections.' read more here).
To repair this problem I ran a full silent repair of the .NET Framework 4.0. Here's how on either a 32 bit or 64 bit computer:
1. Click Start -> All Programs -> Accessories -> Run
2. In the Open textbox paste in the following line (see list of all .NET Framework version install, repair and unistall command lines here):
For silent repair on 32 bit computer with .Net Framework version 4.0.30319 use:
%windir%\Microsoft.NET\Framework\v4.0.30319\SetupCache\Client\setup.exe /repair /x86 /x64 /ia64 /parameterfolder Client /q /norestart
For silent repair on 64 bit computer with .Net Framework version 4.0.30319 use:
%windir%\Microsoft.NET\Framework64\v4.0.30319\SetupCache\Client\setup.exe /repair /x86 /x64 /ia64 /parameterfolder Client /q /norestart
3. Click OK to start the repair
4. After, the repair ran for a few minutes, I restarted IIS 7.5, and things began to work correctly!
Hopefully, that will work for you...
Monday, January 10, 2011
Sunday, January 9, 2011
Saturday, January 8, 2011
ASP.NET Cookies Expires property is not initialized
Browser is responsible for managing cookies; the Expires property is an example of this. The primary purpose of the Expires property is to help the browser perform housekeeping on its store of cookies. From the server's perspective, the cookie either exists or it does not; the expiration is not a useful piece of information on the server side. Therefore, the browser does not provide this information when it sends the cookie. If you are concerned about the expiration date of a cookie, you must reset it.
At times you might want to modify a cookie, perhaps to change its value or to extend its expiration. (Remember that you cannot read a cookie's expiration date because the browser does not pass the expiration information to the server.)
You do not really directly change a cookie, of course. Although you can get a cookie from the Request.Cookies collection and manipulate it, the cookie itself still lives someplace on the user's hard disk. So modifying a cookie really consists of creating a new cookie with new values and then sending the cookie to the browser to overwrite the old version on the client.
The following example shows how you might change the value of a cookie that stores a count of the user's visits to the site:
Dim counter As Integer
If Request.Cookies("counter") Is Nothing Then
counter = 0
Else
counter = CInt(Request.Cookies("counter").Value)
End If
counter += 1
Response.Cookies("counter").Value = counter.ToString
Response.Cookies("counter").Expires = DateTime.Now.AddDays(1)
Source
Tuesday, April 6, 2010
Entity Framework Error 0019
I’ve got this error while refactoring a project that contains an Entity Data Model. I’ve tried to google and find good solution. Here it is:
Errors:
BAModel.csdl(3,4) : error 0019: The EntityContainer name must be unique. An EntityContainer with the name 'BAEntities' is already defined.
BAModel.csdl(118,4) : error 0019: Each type name in a schema must be unique. Type name 'BAModel.Activity' was already defined.
One reason you might see this is if you have two models in a project that have the same schema. Maybe you decided to start your model over from scratch.
But in this scenario, that was not the case. It turned out that the problem was because I had changed the assembly name of the project that contained the model. The reference to the original assembly was still in the client application's BIN folder along with the new one.
Entity Framework was attempting to load the metadata files from both assemblies and detected the conflict.
Cleaning the project didn't fix the problem. The leftover assembly was still there.. I had to delete the dll and pdb file manually.
I first came across this problem and fixed it last week. But it happened again with another solution today and took me a while to remember the cause and the fix. The older I get, the more I need to rely on my blog for retaining that which my memory seems to be incapable of storing away.
Thursday, April 1, 2010
Sitecore - CryptographicException file not found
I’ve got an issue with CryptographicException file not found in Sitecore. See details below
Server Error in '/' Application.
The system cannot find the file specified.
Description: An unhandled exception occurred during the execution of the current web request. Please review the stack trace for more information about the error and where it originated in the code.
Exception Details: System.Security.Cryptography.CryptographicException: The system cannot find the file specified.
Source Error:
An unhandled exception was generated during the execution of the current web request. Information regarding the origin and location of the exception can be identified using the exception stack trace below.Stack Trace:
[CryptographicException: The system cannot find the file specified.
]
System.Security.Cryptography.Utils.CreateProvHandle(CspParameters parameters, Boolean randomKeyContainer) +7715070
System.Security.Cryptography.DSACryptoServiceProvider.ImportParameters(DSAParameters parameters) +258
System.Security.Cryptography.DSA.FromXmlString(String xmlString) +501
Sitecore.Nexus.Licensing.NexusLicenseApi.(String xml, Guid instance) +124
Sitecore.Nexus.Licensing.NexusLicenseApi.GetSnapShot(Guid instance) +683
Sitecore.SecurityModel.License.LicenseManager.GetSnapshotData(Guid instance) +47
Sitecore.SecurityModel.License.LicenseManager.UpdateSnapshot() +70
Sitecore.SecurityModel.License.LicenseManager.Initialize() +8
Sitecore.Nexus.Web.HttpModule.Application_Start() +76
Sitecore.Nexus.Web.HttpModule.Init(HttpApplication app) +435
System.Web.HttpApplication.InitModulesCommon() +65
System.Web.HttpApplication.InitModules() +43
System.Web.HttpApplication.InitInternal(HttpContext context, HttpApplicationState state, MethodInfo[] handlers) +729
System.Web.HttpApplicationFactory.GetNormalApplicationInstance(HttpContext context) +298
System.Web.HttpApplicationFactory.GetApplicationInstance(HttpContext context) +107
System.Web.HttpRuntime.ProcessRequestInternal(HttpWorkerRequest wr) +289
Version Information: Microsoft .NET Framework Version:2.0.50727.4927; ASP.NET Version:2.0.50727.4927
After hours of trying to find the solution I’ve found out that this is IIS settings issue. This issue was caused by MVC 2 installation, unfortunately it’s uninstall didn’t help.
To fix this:
1. go to IIS Manager
2. go to the application pool instance
3. click advanced settings
4. Under Process model, set Load User Profile to true
Hope this will help!
Eugene
Friday, March 26, 2010
How to Remove and Hide Blogger NavBar (Top Navigation Bar)
I find this Navigation bar on top of the blog useless for me and readers of the blog.
Unfortunately it’s not possible to hide this NavBar using blogger settings. But you can do this manually editing Html of the page and adding needed CSS class there. Here are the instructions:
</style>
Then, add the following line of code before that line:
#navbar-iframe{ display: none !important; }
The Blogger Classic Template uses iframe to load the NavBar, and styles it with ID named navbar-iframe. The name actually also works for new Blogger Widget Template too.
Register for Visual Studio 2010 Beta Exams
You are invited to take part in one or more beta exams for Visual Studio 2010 and the Microsoft .NET Framework 4.
If you pass one of the beta exams, the exam credit will be added to your transcript and you will not need to take the exam in its released form. The 71-xxx identifier is used for registering for beta versions of MCP exams, when the exam is released in its final form the 70-xxx identifier is used for registration.
By participating in beta exams, you have the opportunity to provide the Microsoft Certification program with feedback about exam content, which is integral to development of exams in their released version. We depend on the contributions of experienced IT professionals and developers as we continually improve exam content and maintain the value of Microsoft certifications. The following exams are a part of this beta offering.
Exam 71-511, TS: Windows Applications Development with Microsoft .NET Framework 4
Exam 71-515, TS: Web Applications Development with Microsoft .NET Framework 4
Exam 71-513: TS: Windows Communication Foundation Development with Microsoft .NET Framework 4
Exam 71-516: TS: Accessing Data with Microsoft .NET Framework 4
Exam 71-518: Pro: Designing and Developing Windows Applications Using Microsoft .NET Framework 4
Exam 71-519: Pro: Designing and Developing Web Applications Using Microsoft .NET Framework 4
Availability
Registration begins: March 17, 2010
Beta exam period runs: April 5, 2010 – April 30, 2010
Receiving this invitation does not guarantee you a seat in the beta; we recommend that you register as soon as registration opens. Beta exams have limited availability and are operated under a first-come-first-served basis. Once all beta slots are filled, no additional seats will be offered. If you register, please ensure you are committed to attend.
Testing is held at Prometric testing centers worldwide, although this exam may not be available in all countries (see Regional Restrictions). All testing centers will have the capability to offer this exam in its live version.
Regional Restrictions: India, Pakistan, China
You must register at least 24 hours prior to taking the exam.
Please use the following promotional codes when registering for your chosen exam(s):
| Exam Number | Beta Code |
| 71-511 | 511BC |
| 71-515 | 515AA |
| 71-513 | 513CD |
| 71-516 | 516B1 |
| 71-518 | 518PE |
| 71-519 | 519ZS |
To register in North America, please call:
•Prometric: (800) 755-EXAM (800-755-3926)
Outside the U.S./Canada, please contact:
•Prometric: http://www.register.prometric.com/ClientInformation.asp
Test Information and Support
You are invited to take this beta exam at no charge.
You will be given four hours to complete the beta exam. Please plan accordingly.
Find exam preparation information:
Exam 70-511, TS: Windows Applications Development with Microsoft .NET Framework 4
Exam 70-515, TS: Web Applications Development with Microsoft .NET Framework 4
Exam 70-513: TS: Windows Communication Foundation Development with Microsoft .NET Framework 4
Exam 70-516: TS: Accessing Data with Microsoft .NET Framework 4
Exam 70-518: Pro: Designing and Developing Windows Applications Using Microsoft .NET Framework 4
Exam 70-519: Pro: Designing and Developing Web Applications Using Microsoft .NET Framework 4
For Microsoft Certified Professional (MCP) help and information, you may log in to the MCP Web site at http://www.microsoft.com/learning/mcp/
or contact your Regional Service Center:
http://www.microsoft.com/learning/support/worldsites.asp.
•Where can I learn more about the registration process?
•Where can I learn more about the beta exam invitation process?
•Where can I learn more about the new structure of Microsoft Certification?
•Who do I contact for help with this beta exam or other MCP questions?
Tuesday, March 9, 2010
SQL 2008 Management Tools: Can't save changes that require Recreation of Database
New stupid default setting in SQL Server's Management Tools: When you design a table in a database and then try to make a change to a table structure that requires the table to be recreated, the management tools will not allow you to save the changes. Instead you'll be greeted by this friendly dialog:
Notice that there's no option to save the changes - it's a hard rule that is applied upon saving and you can get past this other than back out of the dialog.
My first thought here is "Crap! Now what?" and off I go searching for an option to turn this off. Eventually I find a solution after a quick search online. As it turns out it's just an annoying configuration default setting that can be easily changed, but if you're like me and you spend a while searching around the Management Tools and finding nothing initially, I ended up eventually backing out of my initial database changes and losing a bit of work in the process. It wasn't until a bit later that I found the setting to change.
Hopefully you'll find this entry before you back out of database changes - you can get out of the above dialog, make the settings change and then still go ahead and save changes to your database.
The fix is: Go to Tools | Options | Designers | Tables and Designers and uncheck the Prevent Saving Changes that require table re-creation option:
and that does the trick.
This is a pretty harsh change IMHO. While I think it's a good idea that the tools now detect table recreation changes and can notify you, I think the better option by far would have been to pop up that initial dialog with a warning message AND provide an option on the buttons to either go forward or abort. Instead this arcane switch is going to cause some pause for most people familiar with the old tool behavior. It's not like this option is easy to find - I looked in the database options before I finally found it in the global tool options.
As it is, reverting back to the 'old' behavior now doesn't let you know that a table recreate is required either, so the behavior now is the same as was with the old tools. Here Microsoft added some useful functionality and then UI fails to expose it intelligently...
Tuesday, January 5, 2010
Enable the Secret "How-To Geek" Mode in Windows 7
We haven’t told anybody before, but Windows has a hidden “How-To Geek Mode” that you can enable which gives you access to every Control Panel tool on a single page—and we’ve documented the secret method for you here.
Update: Do not use this on Vista. If you did, you can use Ctrl+Shift+Esc to start task manager, File \ Run and open a command prompt with cmd.exe, and then use the rmdir command to get rid of the folder.
To activate the secret How-To Geek mode, right-click on the desktop, choose New –> Folder, and then give it this name:
How-To Geek.{ED7BA470-8E54-465E-825C-99712043E01C}
Once you’ve done so, you’ll have activated the secret mode, and the icon will change…
Double-click on the icon, and now you can use the How-To Geek mode, which lists out every single Control Panel tool on a single page.
At this point you might notice why this is a stupid geek trick—it’s much easier to use the default Control Panel than navigating through a massive list, and anybody that really calls themselves a geek will be using the Start Menu or Control Panel search box anyway.
In case you were wondering, this is the same as that silly “God Mode” trick that everybody else is writing about. For more on why it’s pointless, see Ed Bott’s post on the subject.
Alright, So It’s Not Really a Secret How-To Geek Mode
Sadly, this is nothing more than a stupid geek trick using a technique that isn’t widely known—Windows uses GUIDs (Globally Unique Identifiers) behind the scenes for every single object, component, etc. And when you create a new folder with an extension that is a GUID recognized by Windows, it’s going to launch whatever is listed in the registry for that GUID.
You can see for yourself by heading into regedit.exe and searching for {ED7BA470-8E54-465E-825C-99712043E01C} under the HKCR \ CLSID section. You’ll see on the right-hand pane that it’s the “All Tasks” view of the Control Panel, which you can’t normally see from the UI.
You can use this same technique for other Windows objects by doing some digging around in the registry… for instance, if you were to search under HKCR \ CLSID for “Recycle Bin”, you’d eventually come across the right key—the one on the left-hand side here:
So if you created a folder with the name “The Geek Knows Deleted Files.{645FF040-5081-101B-9F08-00AA002F954E}”, you’d end up with this icon, clearly from the Recycle Bin.
And it’s even a fully functional Recycle Bin… just right-click and you’ll see the menu:
So here’s the quick list of the ones I felt like digging up, but I’m sure there’s more things you can launch if you really felt like it.
Recycle Bin: {645FF040-5081-101B-9F08-00AA002F954E}
My Computer: {20D04FE0-3AEA-1069-A2D8-08002B30309D}
Network Connections: {7007ACC7-3202-11D1-AAD2-00805FC1270E}
User Accounts: {60632754-c523-4b62-b45c-4172da012619}
Libraries: {031E4825-7B94-4dc3-B131-E946B44C8DD5}
To use any of them, simply create a new folder with the syntax AnyTextHere.{GUID}
Create Shortcuts to GUIDs
Since the GUID points to a Windows object launched by Windows Explorer, you can also create shortcuts and launch them directly from explorer.exe instead of creating the folder. For instance, if you wanted to create a shortcut to My Computer, you could paste in the following as the location for a new shortcut:
explorer ::{20D04FE0-3AEA-1069-A2D8-08002B30309D}
And just like that, you’d have a shortcut to My Computer, which you can customize with a different icon, and a shortcut key if you so choose.
Yeah, it’s a stupid geek trick, but it’s always fun to learn new things.
Note: The Control Panel’s All Items hack and the Libraries hack will probably only work in Windows 7. The others should work in any version of Windows.
Thursday, November 5, 2009
How to use standard FileUpload in AJAX-enabled web applications
I would like to note that this article is not about the ability to upload files to the server without the postback. There are a lot of articles on this topic, just type "AJAX FileUpload" in any search engine and you'll get many examples. However with AJAX they actually have little in common, because the XMLHttpRequest does not support asynchronous uploading of files to the server, they are rather a variety of imitations, for example, using hidden IFRAME element. Nevertheless I want to emphasize that the article is not about that but about the standard FileUpload control.
There are two problems you might encounter when using it on UpdatePanel.
Problem 1
If the postback is caused by a control which lies on the UpdatePanel, the FileUpload is always empty when it come to the server, regardless whether a file has been selected or not.
Example:
<asp:UpdatePanel ID="UpdatePanel1" runat=server>
<ContentTemplate>
<asp:FileUpload ID="FileUpload1" runat=server />
<asp:Button ID="btnUpload" runat=server Text="Upload" OnClick="btnUpload_Click"/>
</ContentTemplate>
</asp:UpdatePanel>
Solution
As XMLHttpRequest does not allow to send files asynchronously, they have to be submitted in a common manner. This problem is well described around, it is solved by registration of the control that has to submit the form as a postback trigger (in the above example it is
btnUpload button). <asp:UpdatePanel ID="UpdatePanel1" runat=server>
<ContentTemplate>
<asp:FileUpload ID="FileUpload1" runat=server />
<asp:Button ID="btnUpload" runat=server Text="Upload 2" OnClick="btnUpload_Click"/>
</ContentTemplate>
<Triggers>
<asp:PostBackTrigger ControlID="btnUpload" />
</Triggers>
</asp:UpdatePanel>
Problem 2
FileUpload does not work if it is loaded not on the initial page load but appears only after asynchronous update of the page part.
Example (pnlUpload panel is invisible in the beginning and is shown after clicking on btnShowFileUpload button):
<asp:UpdatePanel ID="UpdatePanel1" runat=server>
<ContentTemplate>
<asp:Button ID="btnShowFileUpload" runat=server Text="Show File Upload" OnClick="btnShowFileUpload_Click"/>
<asp:Panel ID="pnlUpload" runat=server Visible="False">
<asp:FileUpload ID="FileUpload1" runat=server />
<asp:Button ID="btnUpload" runat=server Text="Upload" OnClick="btnUpload_Click"/>
</asp:Panel>
</ContentTemplate>
<Triggers>
<asp:PostBackTrigger ControlID="btnUpload" />
</Triggers>
</asp:UpdatePanel>
.......................
protected void btnShowFileUpload_Click(object sender, EventArgs e)
{
pnlUpload.Visible = true;
}
Solution
The problem is caused by the requirement that for the normal work of FileUpload the form should have enctype="multipart/form-data". Usually, it is set in overriden
OnPreRender method of FileUpload control. protected internal override void OnPreRender(EventArgs e)
{
base.OnPreRender(e);
HtmlForm form = this.Page.Form;
if ((form != null) && (form.Enctype.Length == 0))
{
form.Enctype = "multipart/form-data";
}
}
Although during asynchronous postback this code is also executed but the form is not updated. That is why it is required to set the form content type explicitly during the first page load, for example, in the
Page_Load event handler of the page or a control where FileUpload is placed. protected void Page_Load(object sender, EventArgs e)
{
if (!IsPostBack)
this.Page.Form.Enctype = "multipart/form-data";
}
In case if this task is repeated in a few places you may do a simple control derived from FileUpload with overriden
OnLoad method and use it. public class CustomFileUpload : FileUpload
{
protected override void OnLoad(EventArgs e)
{
base.OnLoad(e);
if (!Page.IsPostBack)
this.Page.Form.Enctype = "multipart/form-data";
}
}
Source article
Monday, October 19, 2009
Async FileUpload control for AJAX pages
With the new release of Ajax Control Toolkit (v 3.0.30930) released specifically for .NET 3.5 SP1 (with Visual Studio 2008 SP1), there are couple of new controls. One of them is the AsyncFileUpload control.
Thanks to the codeplex community which keeps getting better and better with time, the Ajax Control Toolkit has grown into one of our largest community contributed controls for ASP.NET with about 43 controls that help in accomplishing rich user experiences in ASP.NET Websites.
The AsyncFileUpload is one simple way of accomplishing what I had written earlier using PostbackTrigger, the regular FileUpload control etc., To be able to use the AsyncFileUpload Control, you must have the latest version of AjaxControlToolkit installed. The other pre-requisites are obviously NET 3.5 SP1 and Visual Studio 2008 SP1 (or the free Visual Web Developer Express Edition)
You can download the pre-requisites from the respective links above. For downloading the AjaxControlToolkit, visit the CodePlex site. You can download just the binary files or the Source files as well, if you require to modify. The Script Files is useful if you want to just work with the client side scripts and not use the server controls.
Once you have downloaded, you would need to add them to Visual Studio or VWD.
1. Open Visual Studio and create a new webapplication or website. Click to open the ToolBox
2. Right Click and select “Add Tab”
3. Provide a name say “Ajax Control Toolkit”
4. Right Click the newly created tab and select “Choose Items”
5. Click on the “Browse” button in the file dialog that opens and browse to the place where you downloaded the AjaxControlToolkit binaries
6. Typically I would put them under C:\Program Files\Microsoft ASP.NET for consistency.
7. Select the AjaxControlToolkit.dll and it would list all the new controls.
8. Click “Ok” to add all the controls.
9. You should now see under the newly created toolbox tab these controls.
Once you are done with above, create a simple Default.aspx page in the application you created and drop the Script Manager control into your webform. Next add an UpdatePanel with ContentTemplate. Inside the ContentTemplate, add the AsyncFileUpload control into the webform as well as a button and 2 labels for the uploading and displaying messages respectively. The markup looks something like below
<form id="form1" runat="server">
<div>
<asp:ScriptManager ID="ScriptManager1" runat="server">
</asp:ScriptManager>
<asp:Image ID="img1" runat="server" ImageUrl="~/Images/spin2.png" />
<asp:UpdatePanel ID="UpdatePanel1" runat="server">
<ContentTemplate>
<cc1:AsyncFileUpload ID="AsyncFileUpload1" runat="server" UploaderStyle="Modern" ThrobberID="img1" />
<br />
<asp:Button ID="btnUpload" runat="server" Text="Upload"
onclick="btnUpload_Click" />
<br />
<asp:Label ID="Label1" runat="server" />
<br />
<br />
</ContentTemplate>
</asp:UpdatePanel>
<br />
<asp:Label ID="Label2" runat="server" />
</div>
</form>
Also, you can see that I have added an asp:Image pointing to a spin image that is specified as the ID for ThrobberID in the AsyncFileUpload definition. This is optional but nice to have since this would display the throbber icon while uploading takes time.
Once you are done, you would need to define the action in the codebehind or in the script
protected void Page_Load(object sender, EventArgs e)
{
Label2.Text = DateTime.Now.ToString();
}
protected void btnUpload_Click(object sender, EventArgs e)
{
AsyncFileUpload1.SaveAs(Server.MapPath((AsyncFileUpload1.FileName)));
Label1.Text = "You uploaded " + AsyncFileUpload1.FileName;
}
Notice, the Label in the Page_Load event is just to indicate that indeed the operation happened asynchronously since the time that is displayed initially doesn’t change once you click on Upload button.
Try running this and you will find that the whole operation happens asynchronously without a full page reload. Note that, you would need to still put the AsyncFileUpload control inside UpdatPanel for this behaviour. Otherwise, it would behave like a regular postback control
Wednesday, September 23, 2009
How To: Change Instance Name Of SQL Server
Recently I change the network name of one of my servers at work, because the box changed its job from a virtual machine server to the database server. Everything was going great until I decided to setup the server for replication and received the following error message.
New Publication Wizard
——————————SQL Server replication requires the actual server name to make a connection to the server. Connections through a server alias, IP address, or any other alternate name are not supported. Specify the actual server name, ‘old_name’. (Replication.Utilities)
——————————
OK
——————————
So with a little hunting and SQL queries I found out that SQL Server doesn’t use the network name, it only excepts that as an alias. My SQL Server instance was still named “old_name”. I found that out by running these two queries:
- sp_helpserver
- select @@servername
sp_helpserver select @@servername
So in order to get the network name and the SQL Server instance name back in sync I had do these steps:
- Run this in Microsoft SQL Server Management Studio:
- sp_dropserver 'old_name'
- go
- sp_addserver 'new_name','local'
- go
sp_dropserver 'old_name' go sp_addserver 'new_name','local' go
- Restart SQL Server service. I prefer the command prompt for this, but you can just as easily do it in Services under the Control Panel
net stop mssqlserver
net start mssqlserver
Then after that is done run this again, to make sure everything is changed:
- sp_helpserver
- select @@servername
sp_helpserver select @@servername
I don’t understand why SQL Server uses it’s own name versus the network name, might be due to the fact you can have multiple SQL Server instances install on one machine. It wasn’t too hard to change and probably stems from the days when SQL Server was known as Sybase, all in all, I learned something new and it only took 30 minutes of my day to fine the answer.
From: Source